做了两年多Android应用开发了,期间也实现过好几种主题切换的方式。趁着最近有空,总结一下。 所谓的主题切换,就是能够根据不同的设定,呈现不同风格的界面给用户,也就是所谓的换肤。 1、将主题包(图片与配置)存到SD卡上(可通过下载或手动放入指定目录),在代码里强制从本地文件创建图片与配置文字大小、颜色等信息。 2、Android平台独有的主题设置功能,在values文件夹中定义若干种style,在Activity的onCreate中使用setTheme方法设置主题。 3、将主题包做成APK的形式,使用远程Context的方式访问主题包中的资源。 4、类似小米的深度主题,修改framework中Resources类获取资源的流程,将资源重定向到主题包中。 对于第一种,由于这种方法比较传统,不受限于编程语言,任何平台都可以实现。就不多介绍了。 而第四种,由于涉及的知识比较多,我会在后续专门写一篇文章来描述。 这里,我将主要通过两个小例子来说明第二与第三种方案的实现方式。 我将其分别命名为内置主题与APK主题。 1.内置主题1.1定义属性要想根据主题的不同,设置不同属性,我们至少需要定义下属性的名字吧。要不然系统怎么知道去哪找啊! 定义属性,是在values下进行的。 本例中,我在attrs.xml里定义了几种属性。
<?xml version="1.0" encoding="utf-8"?>
<resources>
    <attr name="colorValue" format="color" />
    <attr name="floatValue" format="float" />
    <attr name="integerValue" format="integer" />
    <attr name="booleanValue" format="boolean" />
    <attr name="dimensionValue" format="dimension" />
    <attr name="stringValue" format="string" />
    <attr name="referenceValue" format="reference" />
</resources>
从上面的xml文件的内容可以看到,attr里可以定义各种属性类型,如color、float、integer、boolean、dimension(sp、dp/dip、px、pt...)、reference(指向本地资源)等等。 1.2定义主题接着,我们需要在资源文件中定义若干套主题。并且在主题中设置各个属性的值。 本例中,我在styles.xml里定义了SwitchTheme1与SwitchTheme2。
<style name="SwitchTheme1" parent="@android:style/Theme.Black">
        <item name="colorValue">#FF00FF00</item>
        <item name="floatValue">0.35</item>
        <item name="integerValue">33</item>
        <item name="booleanValue">true</item>
        <item name="dimensionValue">76dp</item>
        <!-- 如果string类型不是填的引用而是直接放一个字符串,在布局文件中使用正常,但代码里获取的就有问题 -->
        <item name="stringValue">@string/hello_world</item>
        <item name="referenceValue">@drawable/hand</item>
    </style>
    <style name="SwitchTheme2" parent="@android:style/Theme.Wallpaper">
        <item name="colorValue">#FFFFFF00</item>
        <item name="floatValue">1.44</item>
        <item name="integerValue">55</item>
        <item name="booleanValue">false</item>
        <item name="dimensionValue">76px</item>
        <item name="stringValue">@string/action_settings</item>
        <item name="referenceValue">@drawable/ic_launcher</item>
    </style>
1.3在布局文件中使用定义好了属性,我们接下来就要在布局文件中使用了。 为了使用主题中的属性来配置界面,我定义了一个名为activity_theme_switch.xml布局文件。
<?xml version="1.0" encoding="utf-8"?>
<RelativeLayout xmlns:android="http://schemas.android.com/apk/res/android"
    android:layout_width="match_parent"
    android:layout_height="match_parent" >

    <TextView
        android:id="@+id/textView1"
        android:layout_width="wrap_content"
        android:layout_height="wrap_content"
        android:layout_alignParentLeft="true"
        android:layout_alignParentTop="true"
        android:text="@string/theme_text" />

    <TextView
        android:id="@+id/textView3"
        android:layout_width="wrap_content"
        android:layout_height="wrap_content"
        android:layout_alignParentLeft="true"
        android:layout_below="@+id/textView1"
        android:text="@string/theme_color" />

    <TextView
        android:id="@+id/themeColor"
        android:layout_width="wrap_content"
        android:layout_height="wrap_content"
        android:layout_alignLeft="@+id/themeText"
        android:layout_below="@+id/themeText"
        android:text="TextView"
        android:textColor="?attr/colorValue" />

    <TextView
        android:id="@+id/textView5"
        android:layout_width="wrap_content"
        android:layout_height="wrap_content"
        android:layout_alignParentLeft="true"
        android:layout_alignTop="@+id/theme_image"
        android:text="@string/theme_image" />

    <TextView
        android:id="@+id/themeText"
        android:layout_width="wrap_content"
        android:layout_height="wrap_content"
        android:layout_alignParentTop="true"
        android:layout_centerHorizontal="true"
        android:text="?attr/stringValue" />

    <ImageView
        android:id="@+id/theme_image"
        android:layout_width="wrap_content"
        android:layout_height="wrap_content"
        android:layout_alignLeft="@+id/themeColor"
        android:layout_below="@+id/themeColor"
        android:src="?attr/referenceValue" />

</RelativeLayout>
从这个布局文件中可以看到,我在id为themeColor、themeText及theme_image的控件上,分别使用了?attr/colorValue、?attr/stringValue与?attr/referenceValue来引用主题中的颜色值、字符串以及图片。 1.4设置主题及布局文件布局文件与主题都写好了,接下来我们就要在Activity的onCreate方法里使用了。 为了显示两种主题的效果,我写了一个DemoStyleThemeActivity。根据useThemeBlack来设置不同的主题。没打开一次DemoStyleThemeActivity,useThemeBlack就会取反。这样,只要打开两次,就能看到不同的效果了。代码如下:
import android.app.Activity;
import android.content.res.TypedArray;
import android.graphics.Color;
import android.os.Bundle;

public class DemoStyleThemeActivity extends Activity {

    private static boolean useThemeBlack = true;

    @Override
    protected void onCreate(Bundle savedInstanceState) {
        super.onCreate(savedInstanceState);
        if (useThemeBlack)
            setTheme(R.style.SwitchTheme1);
        else
            setTheme(R.style.SwitchTheme2);
        useThemeBlack = !useThemeBlack;
        setContentView(R.layout.activity_theme_switch);

    }

}
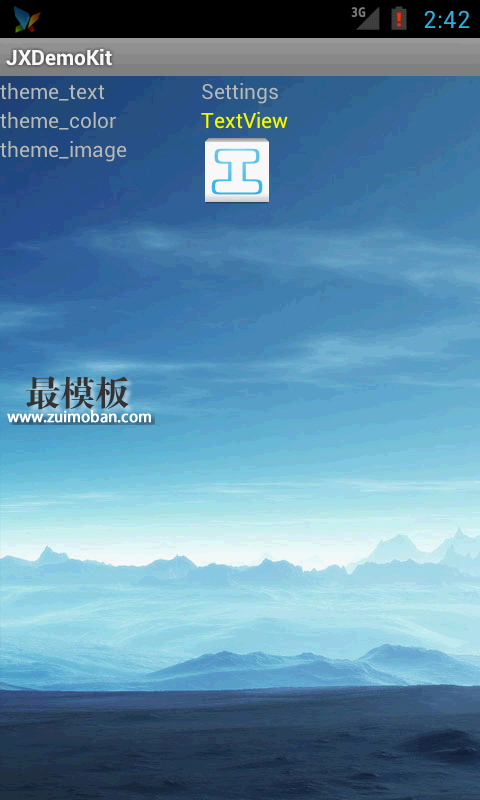
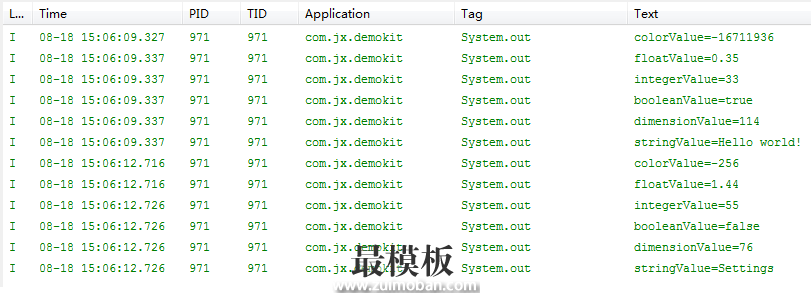
当然,要想主题生效,有一点非常重要:“ setTheme一定要在setContentView之前被调用 ”。要不然,界面都解析完了,再设置主题也不会触发重新创建界面。 更严重的是, 要是默认主题里没那些属性,解析布局文件时候是会挂的啊 !这点在配置多个不同style时要主题,属性可以多,但一定不能少。 以上代码的执行结果如下:   1.5在代码中获取主题资源当然,有的人就要问了,如果我想在代码里获取主题中的资源该怎么办啊?毕竟整数、浮点数、布尔值这些东西在布局文件里没地方用啊。 很简单,要想在代码中获取当前设置的主题的属性值,我们只需要使用Context.obtainStyledAttributes就行了。 还记得1.1里定义的那些属性名吧,Android在编译R.java时为每一个属性都分配了一个标识。我们只需要将这些标识的数组传给obtainStyledAttributes就行了。 然后,我们就能获得一个TypedArray对象。通过它的getXXX方法就能获取到各种属性值了。 代码如下:
import android.app.Activity;
import android.content.res.TypedArray;
import android.graphics.Color;
import android.os.Bundle;

public class DemoStyleThemeActivity extends Activity {

    private static boolean useThemeBlack = true;

    @Override
    protected void onCreate(Bundle savedInstanceState) {
        super.onCreate(savedInstanceState);
        if (useThemeBlack)
            setTheme(R.style.SwitchTheme1);
        else
            setTheme(R.style.SwitchTheme2);
        useThemeBlack = !useThemeBlack;
        setContentView(R.layout.activity_theme_switch);

        TypedArray a = obtainStyledAttributes(new int[] {
                R.attr.colorValue, R.attr.floatValue, R.attr.integerValue, R.attr.booleanValue,
                R.attr.dimensionValue, R.attr.stringValue, R.attr.referenceValue
        });
        System.out.println("colorValue="+a.getColor(0, Color.BLACK));
        System.out.println("floatValue="+a.getFloat(1, 99.99f));
        System.out.println("integerValue="+a.getInt(2, Integer.MAX_VALUE));
        System.out.println("booleanValue="+a.getBoolean(3, false));
        System.out.println("dimensionValue="+a.getDimensionPixelSize(4, 66));
        System.out.println("stringValue="+a.getString(5));
        // Drawable打印了也没什么用,就不输出了
        //System.out.println("referenceValue="+a.getDrawable(6));
    }
}
命令行输出结果如下:  2.APK主题内置主题虽然可以很方便地修改界面,并且不需要怎么改代码。但它有一个比较致命的缺陷,就是一旦程序发布后,应用所支持的主题风格就固定了。要想增加更多的效果,只能发布新的版本。 为了解决这种问题,便有了APK主题方案。 APK主题方案很像之前提到的第一种将主题包保存到SD卡上的方案很像。 它们的共同点是,都需要在代码中手动设置图片、文字、颜色等信息。 主要的区别就是,第一种方案需要我们自行编写资源解析的方法。而通过APK主题方案,可以让Android系统帮我们搞定。 APK主题方案的基本思路是:在Android中,所有的资源都是基于包的。资源以id进行标识,在同一个应用中,每个资源都有唯一标识。但在不同的应用中,可以有相同的id。因此,只要获取到了其他应用的Context对象,就可以通过它的getRsources获取到其绑定的资源对象。然后,就可以使用Resources的getXXX方法获取字符串、颜色、dimension、图片等。 要想获取其他应用的Context对象,Android已经为我们提供好了接口。那就是android.content..createPackageContext(packageName, int flags)方法。 实例代码如下:
import android.app.Activity;
import android.content.Context;
import android.content.pm.PackageManager.NameNotFoundException;
import android.content.res.Resources;
import android.os.Bundle;
import android.widget.ImageView;
import android.widget.TextView;

public class DemoRemoteThemeActivity extends Activity {

    @Override
    protected void onCreate(Bundle savedInstanceState) {
        super.onCreate(savedInstanceState);
        setContentView(R.layout.activity_theme);
        TextView text = (TextView) findViewById(R.id.remoteText);
        TextView color = (TextView) findViewById(R.id.remoteColor);
        ImageView image = (ImageView) findViewById(R.id.remote_image);
        try {
            String remotePackage = "com.xxx.themepackage";
            Context remoteContext = createPackageContext(remotePackage,
                    CONTEXT_IGNORE_SECURITY);
            Resources remoteResources = remoteContext.getResources();
            text.setText(remoteResources.getText(remoteResources.getIdentifier("application_name", "string", remotePackage)));
            color.setTextColor(remoteResources.getColor(remoteResources.getIdentifier("delete_target_hover_tint", "color", remotePackage)));
            image.setImageDrawable(remoteResources.getDrawable(remoteResources.getIdentifier("ic_launcher_home", "drawable", remotePackage)));
        } catch (NameNotFoundException e) {
            e.printStackTrace();
        }

    }
}
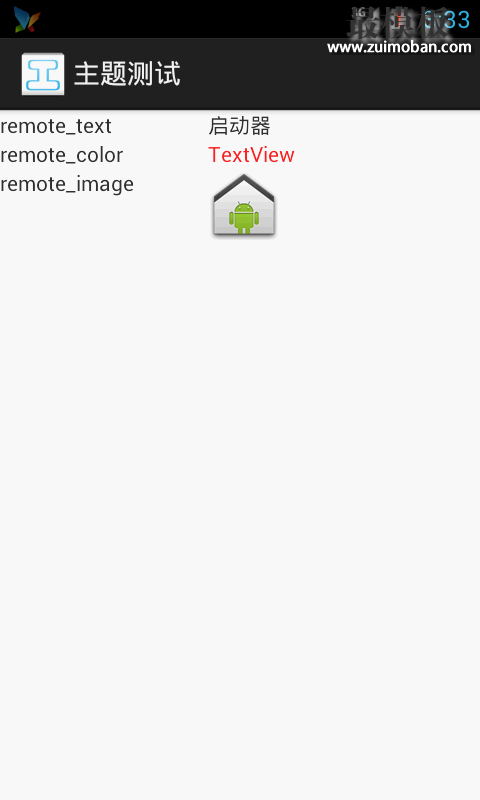
首先,我通过createPackageContext获取到了包名为com.xxx.themepackage的应用的上下文。 然后,通过Resources的getIdentifier方法获取到相应资源名在该应用中的id。当然,有的人也可以通过使用自身应用的id的方式,不过这有一个前提,那就是同名资源在主题包应用与当前应用中的id相同。这貌似可以通过修改编译流程来实现,就像framework里的public.xml那样。不过这不在本文的讨论范畴内。 最后,就是通过Resources的getXXX方法获取资源了。 具体效果如下图所示。  3.高级应用其实对于内置主题与APK主题来说,两者各有利弊。 内置主题实现简单,配置方便。但要想增加新的视效,就需要重新发布一次软件版本。对于目前的大部分用户来说,软件更新太频繁容易降低用户信赖感。 而APK主题虽然扩展性很高,但由于该方案需要在代码中设置所有的可变资源,软件实现周期较长,写代码时容易出错。而且第一版耗时较旧,一旦界面布局改变,需要较长的时间进行代码的编写。 因此,我们可以将以上两种结合起来使用,在代码中预置几种内置主题。 这些内置的主题,主要在界面风格上有所区别,如整体色调。 我们可以在这些内置主题中设置不同的文字颜色。 而对于图片,则在APK主题包中提供。 另外,在每个主题包中保存一个内置主题风格选择属性,这样不同的主题包就可以设置界面显示不同的风格。 比如说,我们的应用中内置两种主题,一种是暗色背景,一种是两色背景(就像Android自带的Holo.Dark与Holo.Light)。在这两种主题中分别设置相应的文字颜色。 而每个主题包中都存储一个字符串,如theme_type。这样,当显示页面时,我们先根据主题包中的theme_type来决定使用哪个主题来setTheme。剩下的图片则直接从主题包中获取。 这样,可以减少对代码的修改,方便主题包的制作。 (责任编辑:好模板) |
Android主题切换方案总结
时间:2016-03-29 22:42来源:未知 作者:好模板 点击:次
做了两年多Android应用开发了,期间也实现过好几种主题切换的方式。趁着最近有空,总结一下。 所谓的主题切换,就是能够根据不同的设定,呈现不同风格的界面给用户,也就是所谓
顶一下
(0)
0%
踩一下
(0)
0%
------分隔线----------------------------
- 上一篇:Android夜间模式实现
- 下一篇:Android Bottom Sheet详解
- 热点内容

-
- Android无法彻底击败iOS 这些原因不能
Android和iOS的支持者经常会预言自己所支持的平台会彻底击败和摧...
- iOS中的深复制与浅复制
多语言中都有深复制浅复制的概念,如C++,ObjC等。简单来说,浅...
- 实现Android中实现View滑动的几种方式
本文提到的所有三种滑动方式的完整demo:ScrollDemo 1. 关于View我们...
- 深入OutOfMemory实战
除了程序计数器外,虚拟机内存的其他几个运行时区域都有发生...
- 浅谈Android Handler 消息机制
Handler是Android中提供的一种异步回调机制。 由于Android中的UI线程...
- Android无法彻底击败iOS 这些原因不能
- 随机模板
-
-
 shopex仿好乐买模板
人气:749
-
 ecshop大气综合商城模板2
人气:810
-
 ecshop仿LVMORE网2014模板
人气:1011
-
 zencart家居响应式网站模板
人气:1790
-
 ecshop英文外贸高尔夫模板
人气:715
-
 shopex仿普派商城模板
人气:757
-
